PyLith development environment Docker image
The pylith-devenv Docker image provides all of the dependencies and defines the environment for PyLith development.
It is built using the Ubuntu 20.04 Linux distribution.
It is intended to be read-only with a separate Docker volume for persistent storage of the PyLith development workspace.
We separate the development “environment” from the “workspace” so that we can update the development environment without affecting the workspace and easily maintain a persistent workspace while starting and stopping the Docker container that holds the development environment.
In addition to the PyLith dependencies, the Docker image includes the following development tools:
gdb (debugger)
valgrind (memory debugging tool)
lcov (code coverage)
uncrustify (C++ code formatter)
The Docker image also defines the environment:
Environment variable |
Value |
Decription |
|---|---|---|
|
|
Python version |
|
|
Username within container |
|
|
Top-level directory for development workspace |
|
|
Home directory for user |
|
|
Directory where code is installed |
|
|
Top-level directory for source code |
|
|
Top-level directory for building |
|
|
Top-level directory where we build PyLith 1 |
|
|
Directory containing installed PyLith 1 |
|
|
Directory containing external dependencies 1 |
|
|
Directory containing Python header files 1 |
|
|
Directory containing MPI header files 1 |
|
|
Directory containing Proj header files 1 |
|
|
Directory containing CppUnit header files 1 |
Setup
You only need to run these setup steps once.
Requirements
Fork repository on GitHub
Log in to your GitHub account.
Fork the PyLith repository https://github.com/geodynamics/pylith.
This creates copies of the repository in your GitHub account.
Create Docker volume for persistent storage
On your local machine, create a Docker volume for persistent storage.
docker volume create pylith-dev-2.2.2
Start PyLith development Docker container
Running the command below will:
Start (run) the Docker container using the
pylith-devenvDocker image and assign it the namepylith-dev-workspace.Mount the docker volume with persistent storage at
/opt/pylith.The
pylith-devenvDocker image will be downloaded from the GitLab registry <registry.gitlab.com/cig-pylith/pylith_installer>.
docker run --name pylith-dev-workspace --rm -it -v pylith-dev-2.2.2:/opt/pylith \
    registry.gitlab.com/cig-pylith/pylith_installer/pylith-devenv:2.2.2
Warning
Closing the pylith-dev-workspace Docker container interactive shell (terminal) will stop the container.
Simply run the command again to restart the container.
Setup directory structure
We will use the following directory structure for the persistent storage.
/opt/pylith
    ├── src
    ├── build
    │   ├── debug
    │   └── opt
    └── dest
        ├── debug
        │   ├── bin
        │   ├── include
        │   ├── lib
        │   └── share
        └── opt
            ├── bin
            ├── include
            ├── lib
            └── share
We place the PyLith source code in /opt/pylith/src.
You should not create this directory as it will be created when you clone (download) the repository.
This directory structure is set up for both a debugging version for development (debug directory) and an optimized version for performance testing (opt directory). For now, we will only setup the debugging version.
cd /opt/pylith
mkdir -p ${TOPBUILD_DIR} && pushd ${TOPBUILD_DIR} && popd
mkdir -p ${INSTALL_DIR}
Clone PyLith repository
This creates a local copy of the repository in the persistent storage volume of the PyLith development container. These are your working copies of the repositories.
cd /opt/pylith
git clone --recursive https://github.com/GITHUB_USERNAME/pylith.git src
Set the upstream repository
The upstream repository is the central, community repository from which you will get updates.
# PyLith repository (repeat for other repositories you forked)
cd /opt/pylith/src
git remote add upstream https://github.com/geodynamics/pylith.git
Fixing path to m4 submodule
For any of the repositories that you forked, you will encounter an error when it tries to clone the m4 submodule, which has a relative link.
The error message will be similar to:
Cloning into '/opt/pylith/src/m4'...
remote: Repository not found.
fatal: repository 'https://github.com/GITHUB_USERNAME/autoconf_cig.git/' not found
fatal: clone of 'https://github.com/GITHUB_USERNAME/autoconf_cig.git' into submodule path '/opt/pylith/src/pylith/m4' failed
Failed to clone 'm4'. Retry scheduled
The best workaround is to redirect your local clone to the geodynamics repository. You only need to do this once after cloning.
# Set URLs for submodules in `.git/config` to geodynamics repository (PyLith repository).
cd /opt/pylith/src
git config submodule.m4.url https://github.com/geodynamics/autoconf_cig.git
git config submodule.templates/friction/m4.url https://github.com/geodynamics/autoconf_cig.git
git config submodule.templates/materials/m4.url https://github.com/geodynamics/autoconf_cig.git

# Update submodules
git submodule update
Note
We use a relative link so that the GitLab mirror works correctly.
The consequence of using a relative link is that your local clone will look for a corresponding fork of the autoconf_cig repository.
Configure and build PyLith for development
Important
Make sure your PyLith clone is on a v2.2 compatible branch.
This is either releases/v2.2 from the geodynamics/pylith repository or one of your own branches from that branch.
cd /opt/pylith/src
git checkout releases/v2.2
cd ${TOPBUILD_DIR}/pylith
pushd ${TOPSRC_DIR} && autoreconf -if && popd
${TOPSRC_DIR}/configure --prefix=${PYLITH_DIR} \
    --enable-cubit --enable-hdf5 --enable-swig --enable-testing \
    CPPFLAGS="-I${HDF5_INCDIR} -I${PYLITHDEPS_DIR}/include -I${PYLITH_DIR}/include" \
    LDFLAGS="-L${HDF5_LIBDIR} -L${PYLITHDEPS_DIR}/lib -L${PYLITH_DIR}/lib --coverage" \
    CC=mpicc CFLAGS="-g -Wall" CXX=mpicxx CXXFLAGS="-g -Wall --coverage"
make install -j$(nproc)
make check -j$(nproc)
Reset ptrace Flag
Attaching the debugger to a forked process can result in the following error:
Could not attach to process. If your uid matches the uid of the target process, check the setting of /proc/sys/kernel/yama/ptrace_scope, or try again as the root user. For more details, see /etc/sysctl.d/10-ptrace.conf
ptrace: Operation not permitted.
The PyLith development environment Docker container sets up /etc/sysctl.d/10-ptrace.conf correctly, but the ptrace_scope variable is still usually 1.
The fix is to run the container in privileged mode as root and restart the procps service.
# Run docker image in privileged mode as root.
docker run -ti --privileged --rm -u root registry.gitlab.com/cig-pylith/pylith_installer/pylith-devenv:2.2.2 /bin/bash

# Verify ptrace setting needs updating
cat /proc/sys/kernel/yama/ptrace_scope
# If output is 1, then continue, if 0 then no need to change anything.

# Verify ptrace setting is correct.
cat /etc/sysctl.d/10-ptrace.conf
# Output should be 0

# Restart the procps service.
service procps restart

# Verify ptrace setting has changed
cat /proc/sys/kernel/yama/ptrace_scope
# Output should be 0
Install Visual Studio Code
Install Visual Studio Code for your computer.
Install the following extensions:
Remote - Containers
C/C++
Docker
Live Share
Python
Uncrustify
Live Share
We recommend also installing the following extensions:
GitHub Pull Requests and Issues
GitLens – Git supercharged
Material Icon Theme
autoconf
Code Spell Checker
Markdown all in One
markdownlint
MyST-Markdown
Remote-SSH
Running
Start PyLith development Docker container
Whenever you need to restart the pylith-dev-workspace Docker container, simply run
docker run --name pylith-dev-workspace --rm -it -v pylith-dev:/opt/pylith \
    registry.gitlab.com/cig-pylith/pylith_installer/pylith-devenv:2.2.2
Tip
Make sure Docker is running before you start the container.
Attach VS Code to Docker container
Start VS Code.
Click on the Docker extension in the Activity Bar on the far left hand side as illustrated in the screenshot.
Find the
pylith-dev-workspacecontainer. Verify that it is running.Right-click on the container and select
Attach Visual Studio Code. This will open a new window. You should seeContainer registry.gitlab.com/cig-pylith...at the left side of the status bar at the bottom of the window.
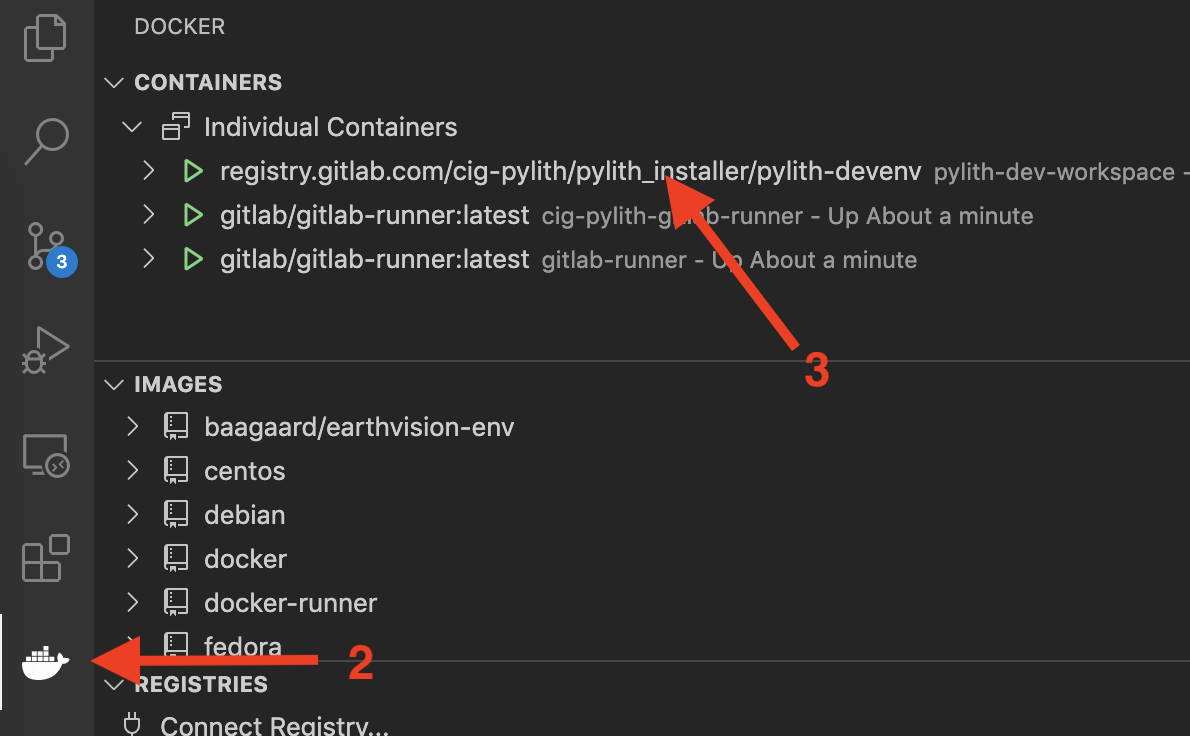
Fig. 1 Screenshot showing how to attach VS Code to a running Docker container.